Setbacks – Just throw money at the problem.
This all changed last weekend.
 |
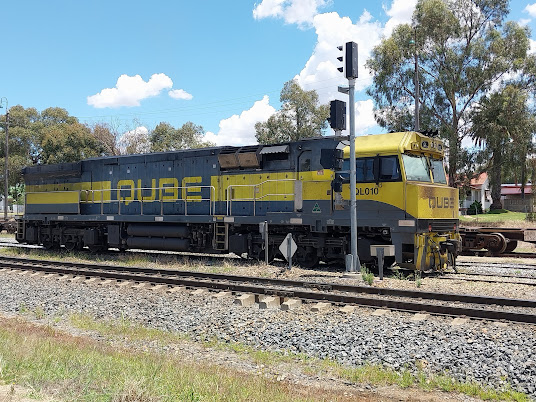
| QUBE QL010 awaits its next assignment at Junee in December. Modern image, and subtle weathering |
 |
| Disappearing along the line are the telegraph poles. These had been pulled out, and dumped into a pile at Junee, in December. At time of writing this blog, they are still there |
 |
| Many years ago, I wrote a pair of Blogs on how to make lineside poles, and it would have been useful to have been able to measure them. Record what you can, as tomorrow, it could be gone |
Revisiting the wiring
Brett (my part time builder) plugged in his battery charger
into a power point on the future layout power 240V circuit. I had previously arranged that this circuit
would have its own circuit breaker, so I could turn off the power when exiting
the room. Well, the circuit breaker was
off – and I assumed I had turned it off.
Well, on re-energizing the circuit, Flash-Bang, the circuit breaker
tripped. Hmmm. Brett advised that I should contact the
electrician
I rang the electrician, Stewie on Monday. To my surprise, he was between jobs, and had
time to diagnose the problem
By following normal model railway diagnosis methods, you
successively halve the circuit where you have a problem, and within 5 minutes Stewie
discovered that on the extension to the last power point in the wall, all 3 wires (neutral, active and ground) were shorted out . As it is now near impossible
to access behind the wall, Stewie used the broken wire as the draw wire to
thread in a new wire.
We then inspected the shorted out wire.
 |
| The cause of the shorting out. |
All the insulation, the white outer, and the colored inner
had been stripped completely. This is
the work of a rat, rather than a mouse.
The damaged wire is around 2.5 metres down from the top of the wall, and for
a rat to get to the wire, it would have needed to descend that distance through
full wall insulation. Stewie told me a story about another job he had, where
the new wiring in an old house was eaten in just a week. Maybe I got off lucky. I thanked Stewie for his assistance, and paid
him immediately.
 |
| Not the best picture, but the chewed wire above is visible in the bottom RHS of this picture. It actually surprised me that this wire could be extracted, and new one run by simply pulling out the old wire and using it as a draw wire for the new wire. I was thinking about the need to use an external conduit, which is still an option |
Rats and me.
I had very little to do with rats after my first year
biology classes at UNSW. However, on
moving to Junee, rats became more than a
byline. Most of them are attracted by
dog food up in the kennels, and they would even chew through the lids of
wheelie bins where we store the food. I
have an adversion to baits, as dead rats killed by poison could in turn be
eaten by eagles, or even the dogs, I set up capture traps.
 |
| Bait the capture trap with peanut butter. This rat from a few years ago, was kind of cute, but others caught were distinctly feral. |
 |
| Multiple capture traps, and an infestation in the dog kennel shed, means meals for eagles, or foxes. I am tolerating the foxes, as they target the rabbits |
Besides the food, the little monsters will
dig holes, and a few manage to get into the ceiling space of the house. Up
to now, I have not seen evidence of rat activity in the garage. In contrast the garage is where mice are. Not the end of the rodent problem either –
there are also dozens of rabbits – some
making their home under my storage container.
Anyone with a ferret?.
The joys of country living…..
Accessing the ceiling space above my train room may be easy
for the rats, but it is not for me. I
have managed to “throw” some rodent bait to roughly where the walls are, and
set up some rat-sack bait on the crawl space where there are some rat
droppings. Hopefully this will do the
trick. Some have suggested ultrasonic
pest devices might also work, but I am fairly sure the yellow tongue walls are
too think for that to be effective.
Train room build continues
A trip to Wagga during the week, and returning with 10
litres of paint colour matched, and 1 litre of primer undercoat. Paint is not cheap – $286.
At least Wattyl is made in Australia.
Interestingly, the 10 litres of white ceiling paint I got from Aldi a
few weeks earlier (it was on mark down special) was also made by Wattyl, and
that cost me $50. Swings and
round-abouts.
Brett assembled the kitchenette cabinets, whilst I quickly
painted the walls area near the window where the cabinets will go to save
awkwardness later. The cabinets are
below the bench.
 |
| I had thought the cabinets would be fitted direct to the floor, rather than on adjustable feet. My concern is that the hot water heater may need additional bracing due to the weight of the water. Basically, now awaiting the return of the plumber to fit the sink, and hook up the pipes. Note the join in the cabinet benchtop |
 |
| This can of silicon adhesive should have been thrown out three years ago, and it was only a suggestion from me to cut into the can that we discovered viable silicon for the benchtop join – applied with a spatula |
Then came the tricky part.
Cutting the benchtop for the L shape.
Success. And then a small
win. Brett asked me if I had any silicon
adhesive, and I did. Despite being 3
years old, and leftover from a caravan roof leak repair, there was enough
silicon still viable within the tube, after cutting into the tube. And being black, the colour was perfect.
Bunnings however did not supply the correct width cabinet
doors, and no drawer support hardware. Not
good enough when they charge me over $90 delivery. This is the third delivery that has had wrong items delivered
Still, with the cabinets in place, the plumbing work can
recommence
Display wall.
With the new paint, I was able to finish my display
wall. I needed no excuse to start putting my display
up. The yellow tongue wall makes adding
these heavy plates quite easy
 |
| 2 coats of paint on the display wall. Junk on the floor |
 |
| A porcelin “High Voltage” sign seemed appropriate next to the circuit breaker board |
 |
| A start is made |
 |
| More plates added. Adding these plates (some of them are quite heavy) to the yellow tongue wall is simply just by screws. It is one reason why I chose yellow tongue |
I have been collecting these plates for close on 40 years, so it is great to finally have them on display. The train room, whilst not finished, is starting to develop its own character. There are more plates and other hardware to be added as time permits. Until then, I have the task of finishing painting of the rest of the walls
NMRA Meeting at Mal’s place
Brett was unable to come on Saturday (Jan 20th) , so I took the opportunity to travel to Canberra for the monthly NMRA AR Region Div2 meeting After the normal banter, show-n-tell and afternoon tea, we all headed downstairs to see how Mal’s new layout was progressing.
 |
| Mal’s layout trackplan (not showing the staging yards). The general size of the room is a three car garage. N scale allows for 2 peninsulars, which will give a good length run. Mal is basing his line on Burlington Northern through Montana. |
 |

 |
| Staging yards are 43cm below the mainline tracks. These staging yards extend on 3 sides of the room, and the storage tracks are extremely long. Mal loves long trains |

 |
| Bridges always add an element of drama to trains running |
 |
| Site of future turntable |

 |
| Yet to be built is the complex helix benchwork to allow connection to the staging yard trackage |
 |
| Use of brackets supports the main line deck, and gives good access to the wide staging yard. Mal has not yet added the tortoise motors, or the extensive electrical wizardary to the staging yards, that will allow trains to be accessed simply. So these staging yards are not yet fixed in place. |
It is always good to see what others are doing, and gain ideas. I like the idea that the staging yard boards can be extracted for fitting the tortoise switch motors, and electronics, and I may try something like for the staging yards below my Bomen station
A thought
Why do we use the term ‘Rats Nest’ for a jumbled up wiring mess? And something that is ‘R S’ (short for ”Rat S**t”) is broken?
Until next time.