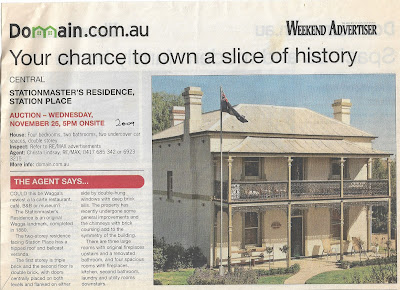
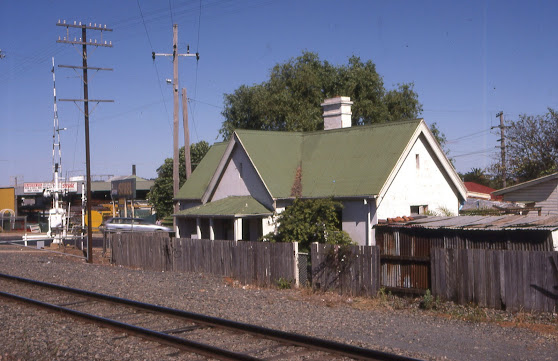
Wagga SM Residence, and Train room update.
Some things cannot be rushed. Model railways tends to take a back seat for other domestic reasons, and in a month passes without an update.
 |
| Parked in Junee at the beginning of October, just waiting for photos. |
 |
| Junee is an active railway town, which is one of the reasons I moved here in 2015. Having a parade of interesting prototype vehicles is a bonus |
Wagga SM Residence – roof
At the finish of last blog post, my model had all the main walls, chimneys, and the rear annex assembled.
 |
| As at last blog post |
 |
| Guttering and eaves added |
 |
| Roof insert |
 |
| Adding the chimney notches into the styrene corrugated iron sheet was a bit of trial and error. |
 |
| There was some gaps in fitting the sheets together. These gaps will be covered up by the roof capping. I also try and minimize the wastage. The entire roof was done with about 1/3 of an A4 sheet |
 |
| Taking the roof on and off, needed the chimney extensions to be removed. This is why in some of my model pictures, the chimneys are not square |
 |
| The front elevation is looking very Georgian in style. Adding the balcony will totally change the appearance |
It was at this point, that I discovered that my supply of Evergreen 0.010 x 0.080 styrene strip, needed for the roof caping, was running very low, and I had insufficient for the roof. So, I have just ordered some more, and am awaiting the postal service.
Train Room progress (in pictures)
 |
| 2nd delivery from Bunnings – the internal doors, framing for the sliding door, and insulation for the walls, Bunnings screwed up, supplying 2 reduced sized doors, where it should have been one reduced sized, and one normal door. Frustrating. |
 |
| More delivery -this time the plumbing. Note: Copper pipework not shown |
 |
| Prefab shower (already owned) positioned in the ensuite, along with the small vanity. The shower was fixed in this location later, after the ensuite wall was built |
 |
| Plumbing installed for the small hot water heater, and sink. The flexible pipes for the shower mixing tap is also seen |
 |
| Incoming water line split for the vanity, and the future toilet cistern. The exposed pipework will not be covered by any insulation – the water outlet pipes in the slab were too close to the walls for this, and the expense to try an move these holes, a bridge too far. The ensuite will have a couple of heater lamps, but that is it for creature comforts.
|
 |
| Inside the vanity – quite a lot going on |
 |
| Entrance doorway framed |
 |
| Insulation added, prior to the yellow tongue sheeting. This section of wall will be used to display my collection of railwayania, including builders plates. Being able to screw these things, (some are quite heavy) directly into the wall will justify the extra expense. |
 |
| Electrical rough in could only happen once the framing was done. The main wiring will come into the room near the entrance door. It will terminate on a subframe switchboard. Five circuits will serve the room. 1) Airconditioning, 2) Hot water, 3) room lighting, and ensuite heater/extractor fan, 4) Kitchenette power points, and 5 Layout power points. Having the ability to turn off the layout power points just prior to leaving the room, will prevent the chance of a soldering iron left on, or some electronics on the layout overheating – both serious fire risks |
 |
| Wiring in the partition wall for the dual power points that will service the train control operating position. There are 6 double power points for the layout |
 |
| Power for the ensuite Tastic power switches, and the light to serve the kitchenette |
 |
| Power points installed in the yellow tongue – separate power circuits – the 2400Watt hotwater on the left, the fridge on the right |
 |
| Loops of wire at the approximate location for the room lighting. Each light will be dual florescent sized LED tubes. These should provide enough room lighting, but not layout lighting which will come later. |
 |
| Additional wooden battens installed between the roof trusses, for the ceiling gyprock sheets. These battens have done a lot visually. |
I have just ordered more insulation, another 13 sheets of yellow tongue, and the cabinets needed for the kitchenette. And the costs are rising. The spreadsheet I am maintaining is currently up just over $17,000, and there are a lot more costs to come – the ceiling, the floor, the painting, the septic system, the airconditioning, the completion of the plumbing, the wiring, plus the labour.
The application for the Septic has gone through to Junee council – had an inspection last week, and the inspector had interest in HO trains, what the room was going to be used for, and was keen in seeing my Wagga station. Junee is certainly a railway town. Hopefully the application will be approved.
Conclusion
So, steady progress on 2 fronts. I am not sure if the train room build is of interest to my readers, but as it is integral to the future layout construction, I am including the process. Anyway, it is my blog, and maybe knowledge may help people decide on how extensive your train room has to be. As I have earlier hinted, a 3 car garage conversion would have been a lot easier without the complications and expense of an ensuite, and kitchenette.
Until next time


