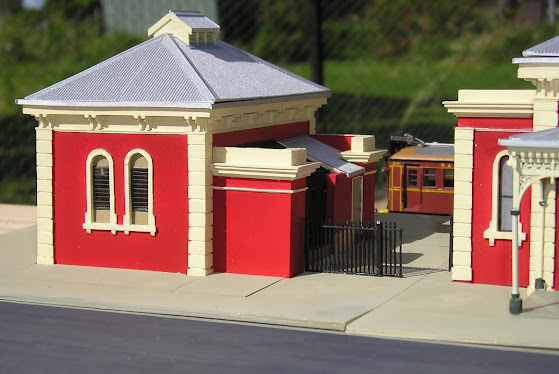
Wagga
Wagga Station Platform – finishing off.
Welcome to
2023. To celebrate the occasion, I am
calling the Wagga Wagga station model “finished”.
(2).jpg) |
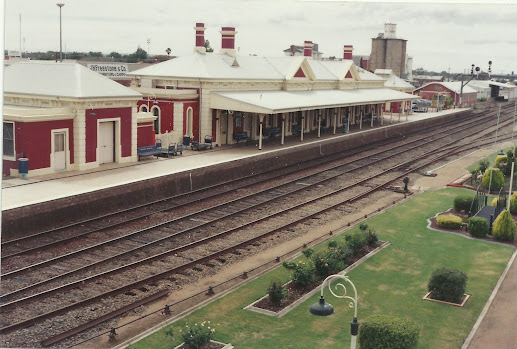
| Wagga Wagga station in 1994 – picture by John Morrison |
As I hinted
on my earlier Blog post, there is a sweet spot where enough detailing is sufficient, and further detailing is a
trade-off between time taken, and improvement to the overall scene. My aim on constructing the station building
was to challenge, and improve my own skills, maybe earn a merit status in the
NMRA structure category, but mainly as a center piece for the future layout.
I am
getting ahead of myself. In the last
month, some further details were made, and installed.
Downpipes
I have
simplified the number installed.
 |
| Downpipes made from round styrene rod, cut and glued as appropriate. Some have been painted in silver, others in the cream colour used for the station details |
These downpipes were generally affixed to the station using tacky white glue, which allows for subtle repositioning on the station
Lamps
At the
front of the station façade, there were three old style lamps mounted above the
windows. I was hoping that I would be
able to locate lamps of the correct style and size on the internet, but I was unsuccessful. So, the option was to make them.

 |
 |
| Cut out 4 panes of clear styrene, and glue them to a 0.040 scrap of styrene. The glue tends top run everywhere, so the clear panes now have turned cloudy |
 |
| Cut out, and shape the 0.040 sytrene. Add a piece of round rod for the top, and a 0.020 piece of styrene at the base. |
 |
| Superglue a piece of brass wire to the base, and then paint – leaving the clear (now very cloudy) styrene unpainted |
 |
| Drill a small hole for the brass wire, and insert the lamp. Glue as needed |
My lamps
are slightly bigger than scale, however, don’t look too bad from normal viewing
distances. My fabrication method is not
the only way to make the lamps. People
with a resin 3D printer, and ability to render the lamp in software, would have
produced a better model. In fact, if
such a model became available, I have a simple replacement option. And for bonus points, if the resin lamp, was
cast in clear resin in an RTV mold, with an SMD LED lamp, and wires, the lamp
could be lit.
Signs
NSWGR
fitted signs to their stations, to aid passengers to what doors belonged to
what rooms.
 |
| This 1980 Intercapital Daylight picture by Stephen Kaiser shows the ‘LADIES’ sign just under the awning, above the loco horns. |
Nothing
like having a real sign to measure

Whilst ‘PARCEL’
is not something useful for identifying my future train room, the cast metal
letters were exactly 3” high.
I created a word document with the appropriate signs, and changed the size. When printed, I could select the print that matched HO scale
RAILWAY MUSEUM STATION MASTER TELEGRAPH OFFICE
RAILWAY MUSEUM STATION MASTER TELEGRAPH OFFICE WAITING ROOM LADIES
MEN PARCELS
RAILWAY MUSEUM STATION MASTER TELEGRAPH OFFICE WAITING ROOM LADIES
MEN PARCELS
RAILWAY MUSEUM STATION MASTER TELEGRAPH OFFICE WAITING ROOM LADIES
MEN PARCELS
RAILWAY MUSEUM
STATION MASTER TELEGRAPH OFFICE WAITING ROOM LADIES
MEN PARCELS
Calibri (body). Point
This size scales almost correctly for HO station signage
RAILWAY MUSEUM STATION MASTER TELEGRAPH OFFICE WAITING ROOM LADIES
MEN PARCELS
RAILWAY MUSEUM STATION MASTER TELEGRAPH OFFICE WAITING ROOM LADIES
MEN PARCELS
RAILWAY MUSEUM STATION MASTER TELEGRAPH OFFICE WAITING ROOM LADIES
MEN PARCELS
RAILWAY MUSEUM STATION MASTER TELEGRAPH OFFICE WAITING ROOM LADIES
MEN PARCELS
RAILWAY MUSEUM STATION MASTER TELEGRAPH OFFICE WAITING ROOM LADIES
MEN PARCELS
RAILWAY MUSEUM STATION MASTER TELEGRAPH OFFICE WAITING ROOM LADIES
MEN PARCELS
Calibri (body). 4 point
RAILWAY MUSEUM STATION MASTER TELEGRAPH OFFICE WAITING ROOM LADIES
MENS PARCELS
RAILWAY MUSEUM STATION MASTER TELEGRAPH OFFICE WAITING ROOM LADIES
MENS PARCELS
RAILWAY MUSEUM STATION MASTER TELEGRAPH OFFICE WAITING ROOM LADIES
MENS PARCELS
RAILWAY MUSEUM STATION MASTER TELEGRAPH OFFICE WAITING ROOM LADIES
MENS PARCELS
RAILWAY MUSEUM STATION MASTER TELEGRAPH OFFICE WAITING ROOM LADIES
MEN PARCELS
RAILWAY MUSEUM STATION MASTER TELEGRAPH OFFICE WAITING ROOM LADIES
MEN PARCELS
RAILWAY MUSEUM STATION MASTER TELEGRAPH OFFICE WAITING ROOM LADIES
MEN PARCELS
RAILWAY MUSEUM STATION MASTER TELEGRAPH OFFICE WAITING ROOM LADIES
MEN PARCELS
 |
| I made the hardware from styrene strip, and then simply cut the signs from the paper, and glued them to the styrene, Followed by paint. They don’t look professional, but quite small, I think I will get away with it. |
Fitting
these under the platform awning was tricky using tweezers and good
magnification, and lighting. The glue I
used was tacky white glue.
Car Park
Many years
ago, car parking in front of the station was angled parking, with a taxi
pickup/dropdown close to the front entrance
My
method to simulate this is to draw
angled line markings on the road surface.
The easiest way is as shown.
 |
| Set square, and white pencil. I marked a spot on the set square for the line length. Using the curbside gutter, the process is close to foolproof |
Seats,
People, and luggage carts
I needed
some seated people for the seats previously painted. I had a selection of ebay purchased seated
passengers, but these were hopeless. I
did have a box of unpainted Preisser seated figures, and much better. Painting –a process taking a few days,
waiting for paint colours to dry. My
main issue is that I have hopeless colour sense for clothing
Standing
passengers came from the Westedge 3D preprinted range, purchased at the
Goulburn N scale convention.
Luggage
carts were etched brass – courtesy of Ross Balderson’s artwork on the Wagga
station awning fret to fill up spare space.
Folded, and painted – they are in need of luggage.
Pictures
I was not going to take photos in the sunlight, so I opted for the shade of my garage eves. Even then, the temperature in the shade was around 35C. I placed a blue whispy cloud backscene on a table, and positioned the station crudely for pictures for this Blogpost. The images have been cropped with photoshop, and do lack the brilliance that better lighting could provide.
 |
| Westedge 3D figures, and some Road Rager australian cars add to the ambience. This is the view the operators of the future layout will have of the Wagga station. I am however, considering a CCTV camera so as to view the other side |


 |
| An Auscision 422, and a set of three Austrains BS/FS carriages is an indication of how much longer the platform needs to be to fit an 8 car RUB set |

 |
| On the platform side, seats, standing and seated people add life to the station |
 |
| Look closely to see that I installed the station master sign upside down. The camera picks up any faults, and is an essential tool in your modelling kit. Fortunately, back on the workbench, the tacky glue allowed the sign to be repositoned correctly |


Conclusion.
Constructing
the Wagga Wagga station has been a
marathon – 2 and a half years since starting
in September, 2020. The process
has been generally enjoyable, and I now
have better skills that can be used for future scratch building projects. The station model could be further improved,
with an interior, more clutter on the roof, weathering, more signage, litter bins, lighting, fences, palm tree and grass, and of course,
extended platform for at least a 6 car train.
If I was starting afresh, knowing now where I struggled, I would invest
time in learning how to model using a 3D printer. Many of the architectural features of the
station are duplicated, and could have been easily printed in quantity, with
consistency that I struggled with.
Anyway, it
is time for a new challenge
Until next
time, build a model or three.